Sorry, but this is really just for the ladies. I often wear camis under my shirts to ensure coverage. However, full camis can become cumbersome, especially in the warmer months. The solution? Cropped camis. I bought some a few years ago, and now they are quite worn out. When searching for new cropped camis, I never found any that met my criteria (spaghetti straps, full coverage, comfortable), so I finally realized that I could make my own using the cheap Forever 21 camis. Watch the video below to see how.
Showing posts with label Tips & Tricks. Show all posts
Saturday, September 2, 2017
Teacher Wardrobe Hack #SundayFunday
I start school next Wednesday. This weekend I'm working to prepare for back to school. So as I hard as I tried, I couldn't think of any teacher hacks to share for #SundayFunday. However, I did just film a video about a teacher outfit hack. So two birds, meet one stone.
Sorry, but this is really just for the ladies. I often wear camis under my shirts to ensure coverage. However, full camis can become cumbersome, especially in the warmer months. The solution? Cropped camis. I bought some a few years ago, and now they are quite worn out. When searching for new cropped camis, I never found any that met my criteria (spaghetti straps, full coverage, comfortable), so I finally realized that I could make my own using the cheap Forever 21 camis. Watch the video below to see how.
Monday, August 7, 2017
Weekly Lesson Plans
<script type="text/javascript">
window.location = "http://www.busymissbeebe.com/lesson-plans-template/";
</script>
Friday, August 4, 2017
Lesson Reflections
Part of my daily routine is to note how each of my lessons went. Making this a routine was a battle for me, but I stuck with it all year long. Completing lesson reflections gave me direction and focus on the changes I could make to my lessons over the summer. I would write notes to myself such as, lesson took long, cut out_____, or had 5 minutes to spare, add _____, or change _____ notes to ______, etc. I was able to make the necessary changes to my Geometry curriculum in about a week (back when I still had momentum and motivation at the beginning of summer).
Actually, I met with my principal early in July to discuss some things because I simply would not be able to relax this summer if they were still on my mind. He told me I needed to take a break and to stop thinking about Geometry for a few weeks. Instead of working on finishing the changes, I threw myself into creating new products for Teachers Pay Teachers, starting a YouTube channel, and improving my blog. I have not gone back to making changes since. As I write this, I have one last unit of Geometry to fix, and all of my General Geometry course to fix. I think this will easily be done within a week because of the notes I have to guide me.
If I'm correct, I was inspired by similar work that misscalcul8 did. (I know I got it from somewhere.) I believe she even recommended completing the task in Google Sheets, which is what I did. Last year, I used an Excel Spreadsheet, which was good, but Google Sheets worked out better for me. As I'm teaching, I usually have an Internet browser open, and I could easily keep Google Sheets open and that would remind me to take notes throughout the day. Even as I was delivering my lessons, I would start thinking about the changes I would need make to note of in my lesson reflection.
As teachers, we are constantly reflecting and making notes to ourselves about the things we want to change or improve. I like this method of documenting those thoughts.
How I Set Up my Sheets:
Once the sheets were set up, I was ready to start reflecting on my lessons. I typed out the title of each topic in bold, and then started typing my reflection of the lesson. If there was an additional day for the topic, I would write in bold "Day 2" and then type the reflection of the second day's activity.
Here is what my lesson reflections now look like:
At the end of the year, I read though everything I wrote and color-coded the text. Anything I need to add is in pink, anything I need to remove is in purple, and anything I need to change is in green. This has helped guide and focus me to knowing exactly what changes I need to make and where. In short, it has been a game-changer in my summer back-to-school preparations.
My goal for this up-coming school year is to remember to refer back to this document before I teach topics for the reminders and tips I wrote to myself. And, of course, I will be making a whole new set of lesson reflections for the new school year.
How do you keep track of your lesson reflections?
Actually, I met with my principal early in July to discuss some things because I simply would not be able to relax this summer if they were still on my mind. He told me I needed to take a break and to stop thinking about Geometry for a few weeks. Instead of working on finishing the changes, I threw myself into creating new products for Teachers Pay Teachers, starting a YouTube channel, and improving my blog. I have not gone back to making changes since. As I write this, I have one last unit of Geometry to fix, and all of my General Geometry course to fix. I think this will easily be done within a week because of the notes I have to guide me.
If I'm correct, I was inspired by similar work that misscalcul8 did. (I know I got it from somewhere.) I believe she even recommended completing the task in Google Sheets, which is what I did. Last year, I used an Excel Spreadsheet, which was good, but Google Sheets worked out better for me. As I'm teaching, I usually have an Internet browser open, and I could easily keep Google Sheets open and that would remind me to take notes throughout the day. Even as I was delivering my lessons, I would start thinking about the changes I would need make to note of in my lesson reflection.
As teachers, we are constantly reflecting and making notes to ourselves about the things we want to change or improve. I like this method of documenting those thoughts.
How I Set Up my Sheets:
- Every course I teach has its own sheet.
- The first row are all of the units for the course. I widened the column for each unit.
- The first column is numbered for the different topics in the unit. This numbering generally corresponds to how I save my files.
- I formatted each cell to keep the text in the upper left corner, and to wrap the text.
Once the sheets were set up, I was ready to start reflecting on my lessons. I typed out the title of each topic in bold, and then started typing my reflection of the lesson. If there was an additional day for the topic, I would write in bold "Day 2" and then type the reflection of the second day's activity.
Here is what my lesson reflections now look like:
At the end of the year, I read though everything I wrote and color-coded the text. Anything I need to add is in pink, anything I need to remove is in purple, and anything I need to change is in green. This has helped guide and focus me to knowing exactly what changes I need to make and where. In short, it has been a game-changer in my summer back-to-school preparations.
My goal for this up-coming school year is to remember to refer back to this document before I teach topics for the reminders and tips I wrote to myself. And, of course, I will be making a whole new set of lesson reflections for the new school year.
How do you keep track of your lesson reflections?
Friday, July 7, 2017
How To Save Time Grading Tests
In January, I joined the 40 Hour Teacher Workweek Club. January's theme was all about assessment. I learned that grading assessments is very time-consuming for other teachers. It has never been all that time-consuming for me, so I thought it would be helpful to share how I grade tests.
As a frame of reference, my tests are typically graded in under 42 minutes for a class of 24 students. (Unless there were proofs. Grading proofs will take longer.)
It may be helpful to understand how I structure my tests. For more information on how I create my unit tests, see my previous post.
For grading these tests, I grade one page at a time. The multiple choice almost always takes up the entire first page. When I finish the page, I turn it over, and grade the next student's first page. Since students only write their names on the first page, once I turn the page, I don't know whose test I am grading. This allows for unbiased grading of the short answer questions. When a student does something crazy I will look back at who it is and make a note to talk about that problem with them, but for the most part, I like not knowing whose test I am grading.
Grading one page at a time is a sort of "batching". Batching is something that is frequently discussed in the 40 Hour Teacher Workweek Club. When you batch a task, you make the task easier to focus on. When I grade one page at a time, I am grading the same few questions repeatedly. This is the main time saver. After the first few tests, I have the answers memorized, I know the common mistakes that are popping up, and I know how many points they lose for those mistakes. It becomes faster and easier to grade the question and then move on. Of course, the longer written answer questions will take a little longer to grade, but the same principle applies.
This is how I have always graded my tests, and I was surprised to learn that not all teachers grade this way. Everyone has their preferences and procedures. Do what works best for you. I just thought my method would be worth sharing since I've never found grading to be time-consuming.
Grading is the one thing that I rarely take home with me. I will begin grading the multiple choice toward the end of the class period when most students are finished, and then finish grading during my preps. The only time I grade at home is when my prep time had to be used for another task or meeting.
As a frame of reference, my tests are typically graded in under 42 minutes for a class of 24 students. (Unless there were proofs. Grading proofs will take longer.)
It may be helpful to understand how I structure my tests. For more information on how I create my unit tests, see my previous post.
For grading these tests, I grade one page at a time. The multiple choice almost always takes up the entire first page. When I finish the page, I turn it over, and grade the next student's first page. Since students only write their names on the first page, once I turn the page, I don't know whose test I am grading. This allows for unbiased grading of the short answer questions. When a student does something crazy I will look back at who it is and make a note to talk about that problem with them, but for the most part, I like not knowing whose test I am grading.
Grading one page at a time is a sort of "batching". Batching is something that is frequently discussed in the 40 Hour Teacher Workweek Club. When you batch a task, you make the task easier to focus on. When I grade one page at a time, I am grading the same few questions repeatedly. This is the main time saver. After the first few tests, I have the answers memorized, I know the common mistakes that are popping up, and I know how many points they lose for those mistakes. It becomes faster and easier to grade the question and then move on. Of course, the longer written answer questions will take a little longer to grade, but the same principle applies.
This is how I have always graded my tests, and I was surprised to learn that not all teachers grade this way. Everyone has their preferences and procedures. Do what works best for you. I just thought my method would be worth sharing since I've never found grading to be time-consuming.
Grading is the one thing that I rarely take home with me. I will begin grading the multiple choice toward the end of the class period when most students are finished, and then finish grading during my preps. The only time I grade at home is when my prep time had to be used for another task or meeting.
Monday, January 2, 2017
Wednesday, August 10, 2016
My #1 Productivity Tip [#MTBoSBlaugust]
It's #MTBoSBlaugust 2016! I'm challenging myself to blog daily throughout August, and you can too. Join the fun!
The first thing anyone will ever tell you about being organized and productive is to make a To Do list. It's simple enough, but there are some quick and easy strategies that can make your To Do list work better for you.
I make my lists in my planner. I have two planners, but my main everything planner is a "Day Designer". This is the type of planner I've been using since my first year of teaching. They've been available at Target every year in July (and they have been getting cuter and cuter each year). I love them because they have the tabs for each month, a monthly calendar, and then weekly pages.
On the monthly calendar, I write down all of my appointments, both for my job and personal. There's also a space for notes for the month. I like to color code my activities to give me a quick idea of what I have going on for the day at a glance. This month, I highlighted my after school activities in blue, meetings in orange, special events in pink, and OLWEUS day in green. (Does anyone else do OLWEUS in their high school? Any suggestions on how I could not hate it?) I did not highlight any of my personal items. Also, I had my bills highlighted in yellow on the days they were due, but I used white out on those before posting them online.
My weekly pages is where I make my To Do lists. It helps me spread my tasks out so that I'm not trying to accomplish everything in one day. When things get really crazy I will make a long To Do list in a random note pad, it is basically a brain dump, and then I will go into my planner and decide which days are best for each task. The way the weekly pages are set up, each day is split into two sections. I usually use the left side for tasks to complete at school and the right side for tasks to complete at home. This has really helped keep me sane when I'm feeling overwhelmed.
The best tip I have for To Do lists requires three highlighters. Pink, yellow, and green; almost like a traffic light. Anything that absolutely needs to be accomplished that day and that is super important is highlighted in pink. Pink is almost red; red as in "stop what you're doing and do this now". Anything that should be done that day, but is not a high priority is highlighted in yellow. Anything that I would like to get done that day, but could put it off another day if need be, gets highlighted in green. (Lately I have been skipping the green highlighter and just using the pink and the yellow because it starts to look a little crazy when everything is highlighted.) This has been a savior for me. It really keeps me focused. When I somehow have a spare 5 minutes at the end of my prep where I would love to get something done, but don't know what to do without starting something that I cannot finish before my next class comes in, I can go down my To Do list in priority order (even though I may not have written it out that way), and find a task that will only take a few minutes.
Highlighting my To Do list is probably my favorite thing ever. This has saved me so much time and energy. I don't do this every day. I save it for the days when I have a ton of things to do, or I have something that is a clear priority. One thing I would like to change about making To Do lists is to write them out the night before. I find myself thinking of things that need to get done before I fall asleep, and then panicking that I won't remember them the next day. My heart starts racing, and the next thing I know, I'm wide awake. I'm hoping that I can get all of those thoughts out before I go to bed, and not have that issue anymore.
The first thing anyone will ever tell you about being organized and productive is to make a To Do list. It's simple enough, but there are some quick and easy strategies that can make your To Do list work better for you.
I make my lists in my planner. I have two planners, but my main everything planner is a "Day Designer". This is the type of planner I've been using since my first year of teaching. They've been available at Target every year in July (and they have been getting cuter and cuter each year). I love them because they have the tabs for each month, a monthly calendar, and then weekly pages.
The best tip I have for To Do lists requires three highlighters. Pink, yellow, and green; almost like a traffic light. Anything that absolutely needs to be accomplished that day and that is super important is highlighted in pink. Pink is almost red; red as in "stop what you're doing and do this now". Anything that should be done that day, but is not a high priority is highlighted in yellow. Anything that I would like to get done that day, but could put it off another day if need be, gets highlighted in green. (Lately I have been skipping the green highlighter and just using the pink and the yellow because it starts to look a little crazy when everything is highlighted.) This has been a savior for me. It really keeps me focused. When I somehow have a spare 5 minutes at the end of my prep where I would love to get something done, but don't know what to do without starting something that I cannot finish before my next class comes in, I can go down my To Do list in priority order (even though I may not have written it out that way), and find a task that will only take a few minutes.
Highlighting my To Do list is probably my favorite thing ever. This has saved me so much time and energy. I don't do this every day. I save it for the days when I have a ton of things to do, or I have something that is a clear priority. One thing I would like to change about making To Do lists is to write them out the night before. I find myself thinking of things that need to get done before I fall asleep, and then panicking that I won't remember them the next day. My heart starts racing, and the next thing I know, I'm wide awake. I'm hoping that I can get all of those thoughts out before I go to bed, and not have that issue anymore.
Friday, November 6, 2015
Constructions Tech Tip
My first year of teaching constructions was a disaster. I never learned constructions when I was in high school, so I had no frame of reference of how to teach them. We constructed circles. That was it. In college, I learned about constructions with Geometer's Sketchpad, but it is so different from doing constructions by hand.
My second and third years of teaching constructions was much improved because I'd discovered http://www.mathopenref.com/tocs/constructionstoc.html. I was able to play animations of constructions while helping individual students that needed more help. There are still some drawback's however. Firstly, we don't use the same type of compass presented in the animation.
Our school has these:
(These compasses are the worst. The red part that is for the pencil slides while you're trying draw arcs.)
We used to have these:
(We still do, but we only have 15 or so, which isn't enough for one class, let alone for everyone to use on our state test. These compasses are the best. They have a locking mechanism so arcs can be drawn without any issues.)
We currently use these:
(They're not my favorite, but they get the job done, and I find that the flat compasses are easier for students to handle than the standard compasses. The biggest bonus of these is that they are cheap. I have enough for all of my students have their own, which means that they can do constructions for homework.)
The second issue with the animations is that they don't always show exactly what I need them to. Sometimes they show extra steps, and they make partial arcs instead of full arcs. These are small differences, but they are enough to confuse students.
So now that I am in my fourth year of teaching constructions. I found another solution, and it was right under my nose the whole time. I am one of those teachers that cannot imagine teaching without a SMART Board. I have been trained in the use of SMART Notebook during my undergraduate education. I knew that SN had construction tools available for awhile, but I never fully explored them. It was daunting, and I had a mile-long to-do list, so I forgot about it.
This year, I needed to show my students a construction, but it was too different from the one available on Math Open Reference. I took a look at the tools, and found that the compass was so much easier to use than I ever imagined. I thought it would be helpful to show a brief tutorial on using the compass on the SB. It takes some practice, but I think it's going to make a big difference in how I teach constructions next year. Take a look at the compass directions I have posted below.
My second and third years of teaching constructions was much improved because I'd discovered http://www.mathopenref.com/tocs/constructionstoc.html. I was able to play animations of constructions while helping individual students that needed more help. There are still some drawback's however. Firstly, we don't use the same type of compass presented in the animation.
Our school has these:
(These compasses are the worst. The red part that is for the pencil slides while you're trying draw arcs.)
We used to have these:
(We still do, but we only have 15 or so, which isn't enough for one class, let alone for everyone to use on our state test. These compasses are the best. They have a locking mechanism so arcs can be drawn without any issues.)
We currently use these:
(They're not my favorite, but they get the job done, and I find that the flat compasses are easier for students to handle than the standard compasses. The biggest bonus of these is that they are cheap. I have enough for all of my students have their own, which means that they can do constructions for homework.)
The second issue with the animations is that they don't always show exactly what I need them to. Sometimes they show extra steps, and they make partial arcs instead of full arcs. These are small differences, but they are enough to confuse students.
So now that I am in my fourth year of teaching constructions. I found another solution, and it was right under my nose the whole time. I am one of those teachers that cannot imagine teaching without a SMART Board. I have been trained in the use of SMART Notebook during my undergraduate education. I knew that SN had construction tools available for awhile, but I never fully explored them. It was daunting, and I had a mile-long to-do list, so I forgot about it.
This year, I needed to show my students a construction, but it was too different from the one available on Math Open Reference. I took a look at the tools, and found that the compass was so much easier to use than I ever imagined. I thought it would be helpful to show a brief tutorial on using the compass on the SB. It takes some practice, but I think it's going to make a big difference in how I teach constructions next year. Take a look at the compass directions I have posted below.
Friday, October 23, 2015
Quick Tip for Constructions
The one thing I always complain about my school is that it's so small that I'm the only Geometry teacher. Being the only Geometry teacher is tough sometimes. I have no one to bounce ideas off of, or to guide me through the ins and outs of being a Geometry teacher. I pick many things up from MTBOS, and Pinterest, but I often have to figure things out for myself. This tip is one that I figured out myself. (It seems so simple though, that I feel it must have been known to many teachers before me.)
Grading constructions can be tricky. At first, I grade for process. Making sure that students remember the steps necessary for completing a construction. Over time, as students become more familiar with the compass, I grade for accuracy. When I grade for accuracy, I look much more closely at the arcs and lines to make sure they are placed almost exactly where they are supposed to be. In the past, to be sure, I would often end up completing the construction over top of the student's construction in colored pen. (And if I made some sort of mistake, there would be a mess.) What I figured out is that I could complete the construction on patty (or tracing) paper first, then lay my construction on top of the student's construction to check for accuracy. This has saved me so much time and frustration. I also suggest taping the patty paper down when completing the construction, as it is prone to shifting.
There you have it. Quick and easy construction grading.
Grading constructions can be tricky. At first, I grade for process. Making sure that students remember the steps necessary for completing a construction. Over time, as students become more familiar with the compass, I grade for accuracy. When I grade for accuracy, I look much more closely at the arcs and lines to make sure they are placed almost exactly where they are supposed to be. In the past, to be sure, I would often end up completing the construction over top of the student's construction in colored pen. (And if I made some sort of mistake, there would be a mess.) What I figured out is that I could complete the construction on patty (or tracing) paper first, then lay my construction on top of the student's construction to check for accuracy. This has saved me so much time and frustration. I also suggest taping the patty paper down when completing the construction, as it is prone to shifting.
There you have it. Quick and easy construction grading.
Saturday, June 27, 2015
Home Office Update
Since my first home office tour post, I had to make a change, and I'm excited to share it. One of my favorite things about how I re-did my home office was hanging the baskets on the wall to create more storage space. This worked well, until the 3M hooks I was using didn't hold up. I initially thought that the baskets were too heavy, so I purchased a larger set of 3M hooks. These didn't hold up either. Now I'm not sure if the baskets are too heavy, or if the adhesive was affected by the weather because we had a very cold winter, and baskets were mounted to an exterior wall. I decided to instead try using picture hooks. (I don't want to jinx it, but so far, so good. I only made this change on Wednesday.)
The part that I'm most excited about is my new bulletin boards! (You can see the baskets on the side.)
I bought the bulletin tiles at Target for $8. (Those are hexagon bulletin tiles! Hexagons! I'm too excited about that.) I've been wanting some kind of bulletin board solution for the wall in front of the desk ever since I finished re-organizing the home office. I also knew that I had to do something to make the bulletin boards pretty, just because. So my love of papercrafting came in very handy.
For the top left bulletin board, I used a blue floral washi tape to create stripes. Washi tape doesn't adhere to cork very well, so I left extra tape on both sides and used my Tim Holt'z Tiny Attacher to staple each end of the tape to the back of the board. For the top right board, I outlined the edges with washi tape. Then I strung three pieces of twine across the board and secured them to the back with the Tiny Attacher. I put a clothespin on one strand. I'll put more up to hang things. I might make some triangle bunting for one of the strands. For the bottom left board, I cut a piece of paper to fit half of the board. I adhered it with Mod Podge, and then outlined the boarder with washi tape. For the bottom right board, I covered the entire board with paper, again using Mod Podge.
I love how this project came out. It brightens up my whole office space, and will hopefully keep me motivated/focused when I start planning for next school year.
The part that I'm most excited about is my new bulletin boards! (You can see the baskets on the side.)
I bought the bulletin tiles at Target for $8. (Those are hexagon bulletin tiles! Hexagons! I'm too excited about that.) I've been wanting some kind of bulletin board solution for the wall in front of the desk ever since I finished re-organizing the home office. I also knew that I had to do something to make the bulletin boards pretty, just because. So my love of papercrafting came in very handy.
For the top left bulletin board, I used a blue floral washi tape to create stripes. Washi tape doesn't adhere to cork very well, so I left extra tape on both sides and used my Tim Holt'z Tiny Attacher to staple each end of the tape to the back of the board. For the top right board, I outlined the edges with washi tape. Then I strung three pieces of twine across the board and secured them to the back with the Tiny Attacher. I put a clothespin on one strand. I'll put more up to hang things. I might make some triangle bunting for one of the strands. For the bottom left board, I cut a piece of paper to fit half of the board. I adhered it with Mod Podge, and then outlined the boarder with washi tape. For the bottom right board, I covered the entire board with paper, again using Mod Podge.
I love how this project came out. It brightens up my whole office space, and will hopefully keep me motivated/focused when I start planning for next school year.
Sunday, November 2, 2014
Made4Math: Feather Pencils
I've been trying to come up with an idea all summer long to maintain my stock of pencils. I know it's inevitable that my pencils are going to just get up and walk out of the classroom, but anything I can do to minimize the loss will be a great help. Last year I tried wrapping colorful mini duct tape around the top of the pencil to identify my pencils. Within two weeks, I was finding the tape adhered to my desks, chairs, and adorning my classroom walls.
I've seen all over pinterest teachers that taped flowers to their pencils. It will definitely remind students that the pencil does not belong to them, but I can only imagine how annoying it is to write with. The real problem though is that a large flower renders the eraser unusable. These teachers have stated that they just hand out erasers for students to use instead. This would be a wonderful solution, but my students will take one eraser and magically turn it into several mini projectiles. (In case you haven't picked up on this fact so far in this post, or any of my previous posts, my students are very destructive.)
I was stuck on the idea of attaching something to the pencil though. Something small, flexible, colorful, and easily identifiable. Finally it dawned on me. I went shopping at Hobby Lobby and came across these:
I know. 1998 called and it wants its pens back. They were only $0.99, and couldn't resist the fun nostalgia.
So I decided that since feather pens are so much fun, why not try feather pencils? I bought a pack of bright, colorful feathers, and attached them to the pencils with washi tape. My only hope is that students don't take these apart. And of course they do. (The most annoying thing is when they have scissors for Interactive Notebooks, some of them will cut the feathers off.) They complain that the feathers annoy them. I have two things to say when they tell me this: (1) Just be glad I didn't put a large flower on it; (2) If you don't like my pencils, bring your own pencil.
One of the things I love about this method is that there is no need to sign up to borrow a pencil. Just take one and put it back when you're done. (Although I've had to remind students that this is what we will have to resort to if they keep taking/mutilating my pencils.) I will be able to scan the room before the end of class and notice who has one of my pencils and remind them to return it. Another bonus is when students do find my pencils in another classroom, they bring them back because they know the pencil is mine. In the past two months, I have lost approximately 30 pencils, which is a HUGE improvement from the pencils I lost by this time last year.
I've seen all over pinterest teachers that taped flowers to their pencils. It will definitely remind students that the pencil does not belong to them, but I can only imagine how annoying it is to write with. The real problem though is that a large flower renders the eraser unusable. These teachers have stated that they just hand out erasers for students to use instead. This would be a wonderful solution, but my students will take one eraser and magically turn it into several mini projectiles. (In case you haven't picked up on this fact so far in this post, or any of my previous posts, my students are very destructive.)
I was stuck on the idea of attaching something to the pencil though. Something small, flexible, colorful, and easily identifiable. Finally it dawned on me. I went shopping at Hobby Lobby and came across these:
I know. 1998 called and it wants its pens back. They were only $0.99, and couldn't resist the fun nostalgia.
So I decided that since feather pens are so much fun, why not try feather pencils? I bought a pack of bright, colorful feathers, and attached them to the pencils with washi tape. My only hope is that students don't take these apart. And of course they do. (The most annoying thing is when they have scissors for Interactive Notebooks, some of them will cut the feathers off.) They complain that the feathers annoy them. I have two things to say when they tell me this: (1) Just be glad I didn't put a large flower on it; (2) If you don't like my pencils, bring your own pencil.
One of the things I love about this method is that there is no need to sign up to borrow a pencil. Just take one and put it back when you're done. (Although I've had to remind students that this is what we will have to resort to if they keep taking/mutilating my pencils.) I will be able to scan the room before the end of class and notice who has one of my pencils and remind them to return it. Another bonus is when students do find my pencils in another classroom, they bring them back because they know the pencil is mine. In the past two months, I have lost approximately 30 pencils, which is a HUGE improvement from the pencils I lost by this time last year.
Monday, July 14, 2014
Class Competition
This past year, I introduced a competition to my Geometry classes. I don't remember exactly what prompted me to do so. I know that toward the beginning of the year, things were not going as I'd hoped. This is largely because I need to work on my classroom management. My big goal for this summer is to read up about classroom management and be prepared to use some new techniques and have definite procedures in mind. (I had these things ready to go when I began teaching two years ago, but what I planned didn't work out. The students are different from ones I had in the past, and the school's discipline structure works differently than how I'd planned. I just never went back and updated my plan.)
I set up a new poster above the computers so that students would not interfere with it. When they did something good, they earned a point. I showed that they'd earned a point by placing a stamp on the poster for that particular class period. I defined the "good" things they could do to earn points, and I adjusted them throughout the year. At the end of the year, they could earn points for the whole class completing their homework from the previous night, for me not having to stop the class to address misbehavior, and for a perfect clean-up. Some days I did better keeping track of these than others. In the third quarter, I made up a grid to help me keep track of points throughout an entire week, and I posted the points earned at the end of the week. This grid served as a much needed to reminder to reflect on whether or not my classes had achieved these things.
The coveted prize for the winning class was one homework pass for each student. Homework passes are not easily earned. I only give homework passes to students that complete all of their homework for an entire quarter, and this year I also gave out homework passes to students that earned a 100% on a test (because it did not happen frequently this year). By the fourth quarter though, the competition ended because I would then be handing out homework passes that couldn't be used. The students were disappointed. I should have found another reward, but I had so much else on my mind that I just didn't. Now that it's summer and I'm slightly refreshed, I suppose I could have just gone through my grades and made-up an old missing homework, and gave some other reward to the students that had perfect homework.
Next year I will implement the class competition again. I will do a better job of reminding students about the competition. I will make a "How do we earn points?" poster. I will carry the competition through to the end. I will ask students reflective questions about their performance. In this new year, I hope to use the competition effectively.
I set up a new poster above the computers so that students would not interfere with it. When they did something good, they earned a point. I showed that they'd earned a point by placing a stamp on the poster for that particular class period. I defined the "good" things they could do to earn points, and I adjusted them throughout the year. At the end of the year, they could earn points for the whole class completing their homework from the previous night, for me not having to stop the class to address misbehavior, and for a perfect clean-up. Some days I did better keeping track of these than others. In the third quarter, I made up a grid to help me keep track of points throughout an entire week, and I posted the points earned at the end of the week. This grid served as a much needed to reminder to reflect on whether or not my classes had achieved these things.
The coveted prize for the winning class was one homework pass for each student. Homework passes are not easily earned. I only give homework passes to students that complete all of their homework for an entire quarter, and this year I also gave out homework passes to students that earned a 100% on a test (because it did not happen frequently this year). By the fourth quarter though, the competition ended because I would then be handing out homework passes that couldn't be used. The students were disappointed. I should have found another reward, but I had so much else on my mind that I just didn't. Now that it's summer and I'm slightly refreshed, I suppose I could have just gone through my grades and made-up an old missing homework, and gave some other reward to the students that had perfect homework.
Next year I will implement the class competition again. I will do a better job of reminding students about the competition. I will make a "How do we earn points?" poster. I will carry the competition through to the end. I will ask students reflective questions about their performance. In this new year, I hope to use the competition effectively.
Tuesday, July 8, 2014
New & Improved Student Resource Center
Between the last day of class and the Regents exam I had two days of downtime. I decided to take advantage of the opportunity to start cleaning things out and organizing for the new year. While doing so I had an idea to improve my student resource center.
Throughout the year I noticed a few issues with my system. Firstly, the folders for absent work are great, but they're not all visible to students, and when they are full of papers, the folders flop over. Secondly, I had the trays organized with papers that students routinely need, but they had a hard time finding them. Lastly, the folder organization system I had was not visible enough to students in the corner.
The first thing I changed was getting rid of the trays. I needed a way to label the three sections so that students could find what they were looking for. My solution was to purchase another set of Sterilite drawers for paper. I labeled each drawer so that students could easily find the paper they are looking for.
The next thing I did was create a new DIY Bulletin Board. I wanted to display all three folders at the same time. I also wanted to get rid of the dry erase calendar, and display the procedure for completing absent work in a neater presentation. I thought the best way to do all of these at once was on a new bulletin board.
I covered the board in construction paper and wrapped the edges with Duckings Duck Tape. I used permanent foam tape to secure the folders to the board. (I wish I could simply use some push pins, but my students will take them from the board, rearrange them, etc. It's not worth the headache for me.)
I had to cut down the paper used to the absent work procedure and the calendar. The procedure is laminated. The calendar needs to be switched every month, so I attached a sheet protector the bulletin board using more permanent foam tape. (I use the calendar to write down all of the homework assignments for the month so students know what homework assignment they are missing.)The sheet protector had to be folded to fit the slightly smaller paper, but the sheet protect did not agree with this. I found a thin piece of cardboard to place behind the calendar page that helped to flatten out the sheet protector.
To finish the board I added an Absent Work banner at the top of the bulletin board and fixed it to the wall. I am very happy with the finished results. I just hope that they don't change my schedule because then I will have to make some changes to the board.
The last thing I did was move the folder organization for extra papers to the front of the cabinet.
I already love the changes. My students liked them too. When they came in the next day for review. I got the ever popular question, "Why didn't you do that for us?"
Before:
Throughout the year I noticed a few issues with my system. Firstly, the folders for absent work are great, but they're not all visible to students, and when they are full of papers, the folders flop over. Secondly, I had the trays organized with papers that students routinely need, but they had a hard time finding them. Lastly, the folder organization system I had was not visible enough to students in the corner.
The first thing I changed was getting rid of the trays. I needed a way to label the three sections so that students could find what they were looking for. My solution was to purchase another set of Sterilite drawers for paper. I labeled each drawer so that students could easily find the paper they are looking for.
The next thing I did was create a new DIY Bulletin Board. I wanted to display all three folders at the same time. I also wanted to get rid of the dry erase calendar, and display the procedure for completing absent work in a neater presentation. I thought the best way to do all of these at once was on a new bulletin board.
I covered the board in construction paper and wrapped the edges with Duckings Duck Tape. I used permanent foam tape to secure the folders to the board. (I wish I could simply use some push pins, but my students will take them from the board, rearrange them, etc. It's not worth the headache for me.)
I had to cut down the paper used to the absent work procedure and the calendar. The procedure is laminated. The calendar needs to be switched every month, so I attached a sheet protector the bulletin board using more permanent foam tape. (I use the calendar to write down all of the homework assignments for the month so students know what homework assignment they are missing.)The sheet protector had to be folded to fit the slightly smaller paper, but the sheet protect did not agree with this. I found a thin piece of cardboard to place behind the calendar page that helped to flatten out the sheet protector.
To finish the board I added an Absent Work banner at the top of the bulletin board and fixed it to the wall. I am very happy with the finished results. I just hope that they don't change my schedule because then I will have to make some changes to the board.
The last thing I did was move the folder organization for extra papers to the front of the cabinet.
After:
I already love the changes. My students liked them too. When they came in the next day for review. I got the ever popular question, "Why didn't you do that for us?"
Sunday, April 20, 2014
Individual White Board Update
So my bags of white boards under each student desk only lasted through half of the school year. Many white boards went missing. Many markers went missing. The erasers usually lasted, unless the entire bag went missing. Then one day when I was leaving school, the custodian came in and as she swept my classroom, I noticed that she was sweeping up my marker board bags and throwing them away! I was furious.
At this point, I already knew that I could not simply ask my students to make sure they put the bag under the desks before they left. I'd been asking them to do that all year, and it never really sunk in. I told my classes about this one morning as I reminded them to deposit their bags under their seats, and a student asked why I didn't just leave the marker boards at the back of the room and have them pick up the items when they came to class. Originally I was worried that this would be too much of a hassle. Having a student suggest the idea made me think that it must not be a hassle after all.
It was settled, I trashed the bags, bought new markers, made new white boards, and purchased a photo box. Here is my new organization system for marker boards:
And so far it's been working great. It's not too much of a hassle for students to pick up a calculator, handouts, and marker board supplies as I'd originally thought. They have even been pretty good about putting the marker board supplies back. The classroom also looks much neater without the marker board bags hanging out from under the desks or on the floor under the desks. Problem solved!
At this point, I already knew that I could not simply ask my students to make sure they put the bag under the desks before they left. I'd been asking them to do that all year, and it never really sunk in. I told my classes about this one morning as I reminded them to deposit their bags under their seats, and a student asked why I didn't just leave the marker boards at the back of the room and have them pick up the items when they came to class. Originally I was worried that this would be too much of a hassle. Having a student suggest the idea made me think that it must not be a hassle after all.
It was settled, I trashed the bags, bought new markers, made new white boards, and purchased a photo box. Here is my new organization system for marker boards:
And so far it's been working great. It's not too much of a hassle for students to pick up a calculator, handouts, and marker board supplies as I'd originally thought. They have even been pretty good about putting the marker board supplies back. The classroom also looks much neater without the marker board bags hanging out from under the desks or on the floor under the desks. Problem solved!
Sunday, September 1, 2013
DIY Whiteboards
I have so many ideas going through my mind right now that I have three different posts that I'm working on. Today, I wanted to share the project I just finished. This summer I bought my own personal laminator. (Yes, a laminator. As in, you know you're a teacher when your favorite appliance is your laminator.)
I've wanted to have whiteboards for every student in my room for a long time, and in laminating all kinds of posters and classroom decor I realized that this was the solution. So I simply laminated plain sheets of paper and cut them in half. (Full sheets were just too big, and not as cost effective.)
For the erasers, I saw that many teachers recommend cutting up and using old socks. (Ewww.) Since it is imperative that boards are erased (to keep the marker from staining them), I knew that good erasers were necessary. I bought 5-9x12"sheets of felt from Michael's for $0.33 each. (I only needed two, but now I have plenty extra erasers.) I cut the felt sheets into 3x3" squares (each sheet makes 12 squares), and now I have a class set of erasers.
For the markers, I am using fine dry erase markers. I bought them on sale at Staples over the summer. (Not pictured, they are currently housed in my classroom.) To store them, I decided to keep whiteboards in the basket under each desk in a ziploc bag, complete with eraser and dry erase marker.

Now that I have this already set up, I'm considering putting all of the supplies my students will need in each bag under each desk. I'm just worried about my supplies disappearing. I'll wait on this idea for now and see if it's absolutely necessary. (As it is, I'm worried about losing the markers. Especially since I have exactly enough.)
I've wanted to have whiteboards for every student in my room for a long time, and in laminating all kinds of posters and classroom decor I realized that this was the solution. So I simply laminated plain sheets of paper and cut them in half. (Full sheets were just too big, and not as cost effective.)
For the erasers, I saw that many teachers recommend cutting up and using old socks. (Ewww.) Since it is imperative that boards are erased (to keep the marker from staining them), I knew that good erasers were necessary. I bought 5-9x12"sheets of felt from Michael's for $0.33 each. (I only needed two, but now I have plenty extra erasers.) I cut the felt sheets into 3x3" squares (each sheet makes 12 squares), and now I have a class set of erasers.
For the markers, I am using fine dry erase markers. I bought them on sale at Staples over the summer. (Not pictured, they are currently housed in my classroom.) To store them, I decided to keep whiteboards in the basket under each desk in a ziploc bag, complete with eraser and dry erase marker.

Now that I have this already set up, I'm considering putting all of the supplies my students will need in each bag under each desk. I'm just worried about my supplies disappearing. I'll wait on this idea for now and see if it's absolutely necessary. (As it is, I'm worried about losing the markers. Especially since I have exactly enough.)
Sunday, August 25, 2013
Easy Homework Pass
This is another idea I adapted from The Nest Effect/The Learning Effect. (Here is the original post.) I assign homework every night (except after a test). I wanted to reward the students that consistently complete their homework, so I incorporated homework passes. I'm tough. I only give homework passes to students that have perfect homework for entire marking periods. Many students complained that this was an impossible feat, yet I'd have at least 8 students earn a homework pass every marking period. I gave students that had perfect homework for the entire school year a king size Hershey's chocolate bar.
Like Tiffany, I made my homework passes for free on Vista Print. I just had to pay for shipping. Prior to distributing the homework passes, I write the student's name on the back and the date that I hand it out. Students turn in their homework pass on a day that they did not complete their homework, and I give them full credit. When I receive the homework pass, I rip it in half and throw it out so that it cannot be re-used.
Sunday, August 11, 2013
Parent Survey
During the last #geomchat that I participated in, other teachers seemed interested in the survey I give to my parents the first night of school. It only seemed natural that I share and expand on the topic.
The first day of school, I go over my course information with my students. I have it formatted as a letter to them and their parents. Their homework is to share the letter with their parents, and have their parents fill out their contact information and sign that they have both read and agree to the course requirements. On the back of the contact sheet is a survey for the parents to respond to in regards to their child. Last year I tried this not expecting great results. I was pleasantly surprised by the volume and quality of the responses I received. They were so helpful in planning my class activities.
I was also given the suggestion to offer the survey on Google Forms for parents to fill in. I am seriously considering this as it will organize all the information into one spreadsheet. However, the drawback is that not all of the families I work with have a home computer/internet access/smart phone.
Here for you is the parent contact information and survey sheet that I use. My contact information sheet is thorough, and I will scale it back this year since we have SchoolTool.
I also found a similar parent survey for free on Teachers Pay Teachers. It's a shorter version, and I like that it's in a 3-2-1 format because I use them with my students all the time.
The first day of school, I go over my course information with my students. I have it formatted as a letter to them and their parents. Their homework is to share the letter with their parents, and have their parents fill out their contact information and sign that they have both read and agree to the course requirements. On the back of the contact sheet is a survey for the parents to respond to in regards to their child. Last year I tried this not expecting great results. I was pleasantly surprised by the volume and quality of the responses I received. They were so helpful in planning my class activities.
I was also given the suggestion to offer the survey on Google Forms for parents to fill in. I am seriously considering this as it will organize all the information into one spreadsheet. However, the drawback is that not all of the families I work with have a home computer/internet access/smart phone.
Here for you is the parent contact information and survey sheet that I use. My contact information sheet is thorough, and I will scale it back this year since we have SchoolTool.
I also found a similar parent survey for free on Teachers Pay Teachers. It's a shorter version, and I like that it's in a 3-2-1 format because I use them with my students all the time.
Sunday, July 21, 2013
APPR Evidence Binder
This past year was my first, and having to go through an APPR process where no one really knew what was going on, and no one could completely advise me was difficult. The whole entire thing was a huge learning experience. My biggest take-away was that I need keep a physical binder. My school uses Google tools, and they advised us to upload everything into Google Docs. I sincerely tried. I was successful for the month of September.
I decided to take a proactive approach, and created an actual binder to use for next year. I created some simple documents on Microsoft Word and I feel completely at ease going in to the new school year. What's in my binder? A calendar (August - June), a parent contact log, a student contact log (for emails), a meetings log, professional collaborations log, a formative assessment checklist, professional development log, and a reflections log. I have tons of pockets in my binder so I can add other things as I go. (For example: sample email correspondence with parents - I can just print them and place them in my binder.)
I love what I have so far, but I am determined to improve. I already have another document I want to add. This is definitely a work in progress. Any ideas or suggestions?
The file of documents that I've included in my binder are available for purchase in my TPT Store.
I decided to take a proactive approach, and created an actual binder to use for next year. I created some simple documents on Microsoft Word and I feel completely at ease going in to the new school year. What's in my binder? A calendar (August - June), a parent contact log, a student contact log (for emails), a meetings log, professional collaborations log, a formative assessment checklist, professional development log, and a reflections log. I have tons of pockets in my binder so I can add other things as I go. (For example: sample email correspondence with parents - I can just print them and place them in my binder.)
I love what I have so far, but I am determined to improve. I already have another document I want to add. This is definitely a work in progress. Any ideas or suggestions?
The file of documents that I've included in my binder are available for purchase in my TPT Store.
Sunday, July 7, 2013
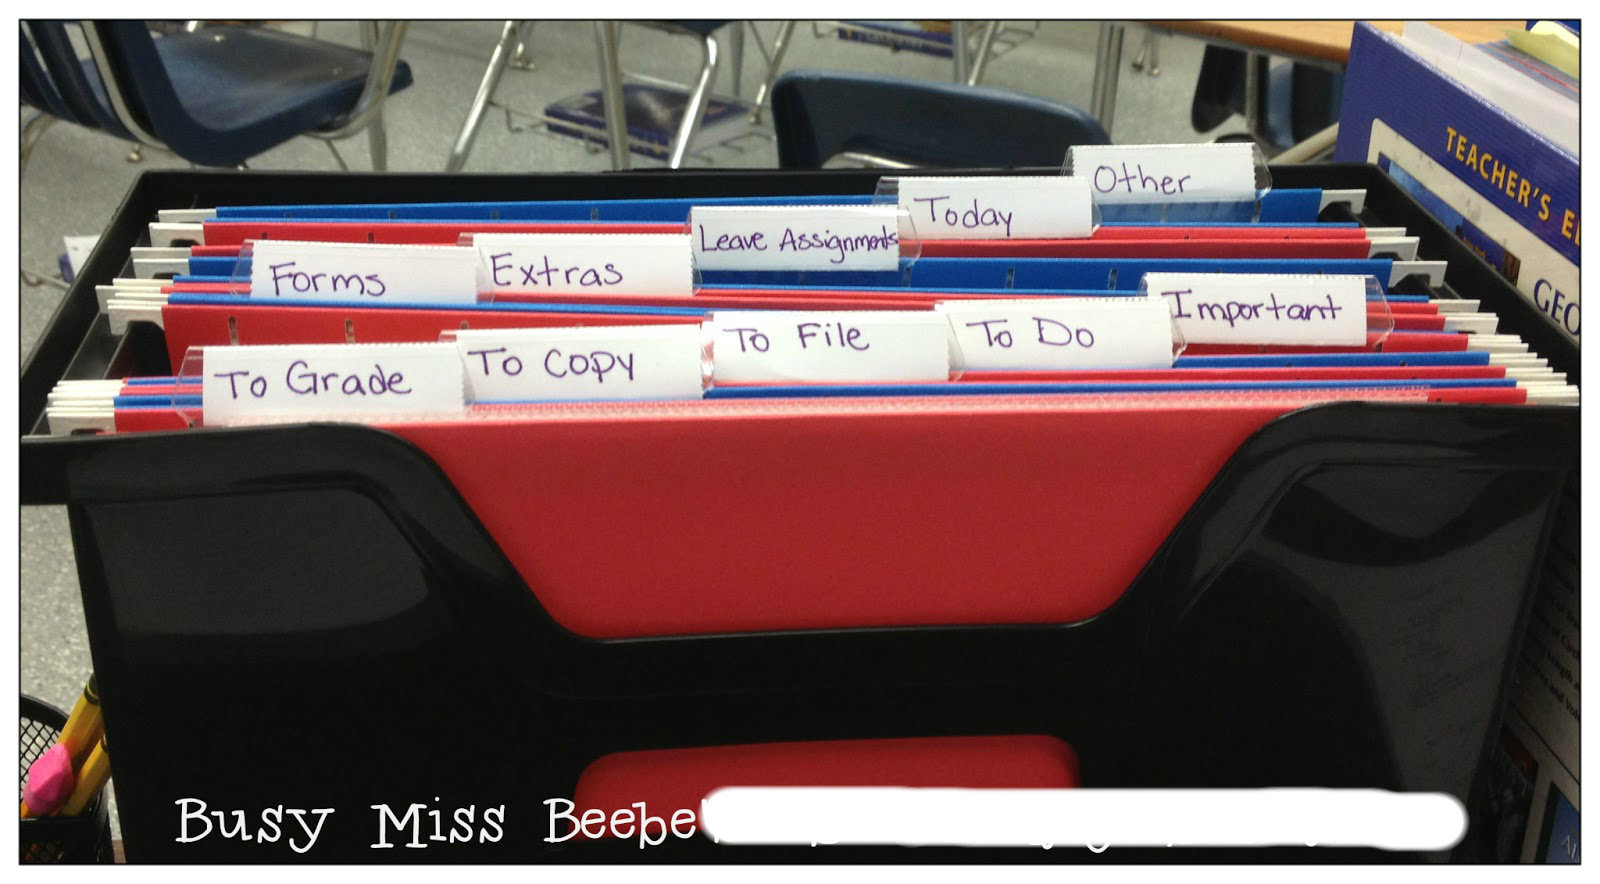
Desk File System
Subscribe to:
Posts (Atom)
Thank you!
Thank you for being patient as I got my new blog set up. I am slowly releasing updated versions of old posts while I add new content. Plea...
-
Our ninth unit was on Measurement. Measurement mostly applies to three-dimensional shapes, but it is necessary to also discuss two-dimensio...
-
In the 40 Hour Teacher Workweek Club, Angela Watson gave us a list of things that we can accomplish to reduce stress when we return to schoo...
-
Here is unit 3... The table of contents and unit self-assessment. We started with naming lines and angles. I prepared a page for fill...